
GT&T updates, changes, feedback, commentary and clarifications
Numerous other tips, clarifications and additional suggestions can be found in my newsletter archive, and more recently, in my blog. But here are a few important ones to start with:


Double-acting truss rods available now --and recommended!
The bent, over-and-under truss rod called for in the book was fine when I and Jon wrote the book over 30 years ago. It was the state of the art then. But it could just adjust one way; it could just bend the neck back. But several steps subsequent to it’s installation in the neck often results in the neck needing to be bent forward—steps such as glueing on the fingerboard and fretting often induce an unwanted backbend into the neck. So if you had a one-way rod in the neck, you'd be out of luck (you'd have to heat-bend the neck back to flat). The work-around was to pre-tighten the rod in the neck, plane the fingerboard flat again; then arch it and fret it it the usual way. This is described in the text. This gives the rod a small amount of reverse-function, needed to return to fretted neck back to straight, or allowing the appropriate relief for the subsequent set-up procedures.
Ever since the two-way rods became available about 10-15 years ago, I am recommending them now because they simplifiy the neck-building steps considerably, dispensing with having to re-plane the fingerboard, which is a challenge on ebony, especially among beginners. I'm now recommending the LMI two-way rods, the Stu-Mac ones being the more massive and complex design. I also prefer the adjuster lying inside the guitar, accesible through the soundhole—than the carving out a massive void in the headstock just behind the nut, which weakens that already-highly stressed area..
I've tried a commercial design with excellent results: Indeed, it has become my preference over the years: it's a "Double-Acting Truss Rod" which works in both directions. Double-acting rods can be purchased from Stewart MacDonald or Luthier's Mercantile for around $20+. You will have to rout a 1/4 round-bottom slot within 1/8 of the bottom of the shaft, and then file the bottoms of the threaded blocks on each end of the rods into a curve so that it will seat properly into the round bottomed slot. I far prefer to make them accesible through the soundhole, rather than behind the nut, an option that critically weakens the headstock/neckshaft joint area ("the hyoid").
Big spenders will like a particularly nice one in stainless steel for $40.

Retrospective thoughts...
'Jon and I wrote this book in 1985, and to my great joy and satisfaction, it has become a perennial bestseller, and consequently the standard textbook in the guitarmaking field. It was truly a labor of love, its creation being an enormous challenge, burden and sacrifice (writing the book was like "enduring a protracted illness") but the payoffs have been ample: over the years I have made countless friends and interesting new acquaintances as a direct consequence of that effort. Proudly, I have watched the field blossom with a great number of new, fine builders which have "graduated" from the book and from their additional efforts and sacrifices. Together with a burgeoning market for fine handcrafted artesanal guitars, these many new builders have entered the field and have lifted American guitarmaking into a true Golden Age. I'd like to think that my book has contributed to this resurgence!

Upper Transversal Graft dimension error in early editions
IIn early editions of GUITARMAKING, diagram 7-7b on page 15 showing the "schedule of final finished brace-blank cross sections" has a dimensional error shown for the steel string UTVGFT (upper transversal graft). It shows the width of the graft as being 1". In later editions, this was corrected to show 7/8", after it was realized that the space alloted for it between the headblock and the upper transversal face brace was 1", and you can't fit a 1" object into a 1" hole!

Swapped captions in classic brace dimension diagram
A reader discovered swapped captions on the CLASSIC section of diagram 7-7b on page 151. The handwritten legends for "ros.gft (2) 4"L" and "utvgrft (1) 5 1/2" are mistakenly swapped. No profound consequence. These grafts are minor components simply used to "strap" the soundboard fibers together at weak areas, or areas of shear stress, and their precise length or width are not a critical factor in the sound or stability of the guitar.

Workboard shim and clamping shoe note
The diagram on page 36, figure 3-5b shows a dotted rectangle in the middle of the shim. The text describes this as where a small piece of cork should be glued.The shim supports the transversal face braces right under the workboard shoe. The text does not suggest that in addition, since the lower cross strut is arched, the clearance to the workboard is reduced and thus you should sand that piece of cork until it is thinner by the indicated arch deflection--than the outer cork lining.
NOTE: You must be careful when tightening down the clamping shoe over these shims. The thumbscrew or bolt must be snugged down firmly, but be aware that if you bully the tightening of the clamping shoe, it is entirely possible to collapse the tiny cork rectangles and break something on the top. It can also tip the headblock back into the shim cavity and spoil the neck angle.
The paper and cork shim is a time-saving alternative to the traditional hollowed workboard. My concern over this possibility that students might overtighten the workboard bolt, has driven me in recent years to recommend to students, as an alternative, to dispense with the workboard shim altogether and attempt the more choresome alternative of a hollowed workboard: to hollow out the actual workboard with a scraper blade directly under where the arched lower transversal (CL) or the arch upper transversal and x-brace (SS) is expected. As a hollowing guide, use the same arch template that you used to arch the curved braces, as you check your progress while scraping the hollow into the workboard. Extend the scraped area, feathering it up towards where the soundhole would be, and down gently towards where the bridge would be. It should be correct in depth right at the main brace locations, but if it is not strictly accurate to the way the top would flex below or above the main brace(s), it is not critical--because the top plate is resilient and will temporarily distort without harm if the precise curvature of the workboard doesn't precisely match the curvature of the top. But it should match right under the main brace(s).

The height difference between the classic headblock and tailblock is only 1/16" !!
II'm to the point in your book where I'm geting ready to arch the back on the classical guitar I'm making. I realize that the amount of the arch is much less in the classical, than on the steel string, but I can't figure out how the arch is supposed to look if the tail block is 3 3/4 inches and the head block is pretty close to that, at 3 11//16. If it's just 1/16 this seems small enough so that it could be disregarded. I'm thinking about adding an additional 1/4 to the tail block to provide for a more significant arch. What do you think?
No, don't add any extra height to the tailblock Remember that the 3 3/4" tailblock is mounted on the top, so the starting difference is not 1/16" but more like 1/8" to 3/16". The difference will be exacerbated when you trim the sides down to the proper taper between the two blocks, and then applying the large sanding board. That will apply a slope to the top of the
headblock, and remove yet another 1/8" or so from the front of the headblock. Traditionally, unlike on the steel-string, the arch on the classic AND the slope of the back are indeed subtle.
Improvements on the one-way rod (Chronicle press edition)
When the book was written in 1984 this over-and-under, single-action truss rod was the best design available. It was powerful and effective in bending the neck BACK against string tension. The book procedure added a slight FORWARD adjustment to its action—useful for returning a neck that was back-bent after driving in frets into narrow fret slots (or straightening a neck that back-bent after glueing on the fingerboard)—by pre-tensioning the installed rod, then planing the resulting hump off the fingerboard before radiusing and fretting. Any resulting back-bend could be remedied by loosening the pre-tightened rod.

Help! I can't find the truss rod nut you require!
Folks are having a bear of a time finding the truss rod nut which I recommend--which is actually known as a Hexagonal Brass Spacer Nut. They are also called "standoff" nuts. They are difficult to find because they were used as spacers between circuit boards, and are old-technology artifacts. Here are some alternatives.
1- They are used in the electronics industry so are available in large electronics hardware supply catalogs. They are often available in large hardware stores in the fastener section n (but not in brass which is preferable--you want the bolt to strip first, before the thread in the rod does). Unfortunately the ones in hardware stores are most often found only in steel. There are many sources, but here's one recommended source from Sanaka Thompson of Kona, Hawaii. Before proceding, however, check out the double acting rods as an alternative, seen immediately to the left.

A recommended alternative to the pinned mortise neck joint
IA new hardware-based neck joint replaces the book's indicated pinned mortise-and-tenon joint. Easier, better. You can interpolate the information into the book's text, or if you've already have built the neck and body, you can upgrade the design from pinned to bolted with several addition drilled holes. HIGHLY RECOMMENDED.
Headblock dimension typo error in early editions
The earliest (hardcover) Rosewood Press editions of the book had a glaring dimension error in diagram 9-6 on page 191 captioned "The mortised headblock three-view (steel string)" It showed the over all height of the headblock as 3 5/8" PLUS the 1/2" height of the angled cutoff segment on its bottom. People following this would have ended with a headblock on the guitar which was considerable taller than it should be (some folks informed me that they just trimmed it off). The error was corrected in subsequent editions which properly showed that the overall height of the blank was 3 5/8 BEFORE the 1/2" angled cutoff segment was sawn away--leaving a headblock with its mortised end 3 1/8" in height. For those with the older editions, here's a scan of the corrected version found in the corrected editions and the paperback:

Tips on Rubber Rope
Readers are complaining that automobile inner tubes for making the rubber rope (for roping the back while glueing it onto the guitar shell) are getting harder and harder to get, and while the book text discourages people from using a truck inner tube (because its "too heavy") it seems expedient to recommend these now--because these indeed are far more common to find since they are not obsolete on truck like they are on tires. Check the Yellow Pages for truck repair shops. You may have to slice the rope into a slightly narrower band than what's indicated in the book, but you'll get a far, far longer strip than if you had used an automobile tube!

Internal fingerboard gluing caul
Confusion has arisen from:diagram 10-16 on page 220 titled "The upper face brace/cross strut caul." it is indeed the upper face brace caul for the steel-string, not the classical, and no distinction is made in the text. A reader building a classic guitar must extrapolate from the text, and use the actual measurements from the instrument to devise the caul for their classical guitar.

It says to leave only 1/8" for the nut!!
I'm trying a classical. I'm in the process of laying out the head block. It says to measure an 1/8 of an inch from the line where the plane of the head meets the plane of the neck and draw a line. This to indictate where the fingerboard is to begin. But the nut's going to be a 1/4 inch thick. Right? Shouldn't I leave a 1/4 inch space?
Yeah, it sounds funny, I know. But it makes sense after you read ahead, on Page 63 "Applying Headstock Veneer" and then page 310, Step5-- Classical only: Cutting Back the Nut Slot." Jon's technique was to cut back the veneer AFTER the fingerboard is glued down, in case the fingerboard ends up wobbled away a bit after the glue dries. It makes sense, since the maximum thickness nut blanks available commercially come 1/4" thick, and if it wobbles to 1/4+1/32, then you're going to have a bad fitting nut. His procedure avoids this possibility.

Alas, no French Polishing details...<sob>!!
II have gone through your book very throughly as preparation for my building of a Martin Guitar with their kit. I found the book very well written and extremely helpful. What I hope to know more about is French Polishing since I don't have the use of spray equipment available to me. Your book has just that one picture on it and it doesn't really describe very much. Can you give me some tips and pointers?
My book never intended to cover french polishing at length. Because first, I am not practiced at it, and second, the directions required are quite lengthy--not that its a long process, but that it takes a lot of space to explain it properly--and the book had reached 400 pages as is. But you have at least two options:
There are numerous french polishing videos on YouTube by amateurs with the temerity to attempt to teach before they've made all the mistakes. These are free, of course, but you are getting what you paid for. I suggest you invest $31 and purchase instruction by a master: an excellent French Polishing video by Ron Fernández is available here.

Side-bending caveats and recommendations
I bought your book a couple weeks ago, and have read it from cover to cover. I don't know, however, how to make the side plates. There weren't any pictures, and because you don't mention lengths, as each guitar can be different, it is unclear. Could you please add some clarification? Your book is wonderful, thanks for all the help.
All the information you need to prepare the sides for bending is in the book, but unfortunately it is dispersed in different locations, so I'll provide a map of sorts:
What are the starting dimensions of the side blanks?
The dimensions are in the Bill of Materials in the back of the book, on page 383:
How do I reduce the blanks to their finished thickness?
You can find that information at the end of Chapter 5, Step 5- Planing the Sides, page 113: The beginning of the chapter on page 104, specifies that the beginner should strive to reduce the side plates to .085" on steel string and .080" on classic. For the beginner, the sides and back are particularly tricky to hand plane to a consistent thickness, so I would highly recommend that you ask the supplier to reduce them, or barring that, locate a small millworking shop in your area that will put your plates through their abrasive planer for you, and reduce them to the precise specified thicknesses. Also, obtain several other side blanks of less precious material and have them reduced also so you can practice before attempting to bend your $500 brazillian rosewood sides!!

Heel dimensions don't add up?
I am a first time builder and am having trouble with the heel dimensions. On pg. 50 of the manual it states that the height of the heelblock and shaft taken together is 3 1/8". Also my carved heel compares well with the heel curve outline full size drawing on pg.82, but the heel seems to be about 7/8" short,especially when compared with the side dimensions of 4". Is this a typo, and if it is, would it be possible, instead of redoing the entire shaft and heel again, to simply glue on an extension to the existing heel to make up the difference?
Fear not. You're on the right track. No repairs or additions necessary.
Take a look at the headblock drawing on page 191. The sides of the guitar will taper from a maximum of 4" at the tailblock to about 3 1/8" at the headblock. I say "about" because by the time you include the thickness of the soundboard and the thickness of the back plate; and after all the trimming of the headblock to get everything to fit just right, it may end up a bit more or less. But you'll see that 3 1/8" is in the ballpark for the the heelblock and shaft taken together; as well as for the headblock, and your sides will be trimmed down to meet them both in Chapter Nine.

Dimension error on heablock fixture diagram
On Page 212, Diagram 10-1a, the distance from the center of the bolt hole to the bottom of the headblock fixture should be 7/8-inch, not 1 1/8-inch as shown. People using the fixture to secure the headblock during assembly must have already noted that the bolt didn't line up with the truss rod hole in the headblock. You will have to redrill the fixture to line up the holes.
Is the truss rod spline necessary?

Why does the truss rod nut deflect downward when tightened?
The truss rod I used is a pre-fab model from LMI that seems to sit higher in the slot than your example in the manual. Is it absolutely necessary to insert a spline over the rod, and do I dare increase the depth of the truss slot? Is there a substitute for the spline you suggest?
No, don't make the slot deeper. 1/8-inch left of wood under the slot is optimum. Less, and you risk cracking the neck shaft when you tighten the rod and that would be disastrous. If you leave the bottom "web" too thick, the truss rod will lose efficiency. The deeper the rod is in the neck, the more efficiently it works. The spline essentially is there to take up space, but it also performs a minor function of cushioning the upward pressure of the rod on the brittle ebony fingerboard.
Is it normal for the hexagonal nut and spacer block to deflect downward when tightening for the fingerboard arching? ( I used your new spacer design).
No, a small downward deflection is inevitable. But if it deflects dramatically downward, the problem could be as simple as that the rod hole in the spacer block is too large, or as problematic as the entire rod having too much slop (room) in the slot. Every-thing has to be snug in there. If not, something's going to distort when you tighten.
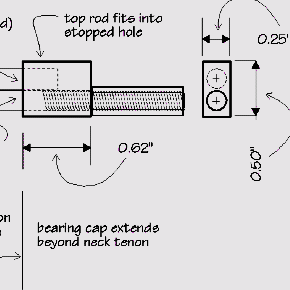
Help, > Please confirm the measurements of the bearing cap shown as an update. > Your more massive cap seems to have shrunk some in height and width and > gotten thicker only. The old way you drilled through the 1/2" side with 3/16 > & 13/64 and now its through the 1/4 " side leaving very thin sides is this > correct or am I missing something? the old cap was 1/2 x 3/4 x 3/16 and the > new is 1/4 x 1/2 x 5/8 (.625)
Yes, the update is a better design, although it requires a bit more precise drilling. However the earlier (vertical) cap tended to rotate under tension and sometimes jam. The longer, lower (horizontal) model holds on to more of the rod's length and stands up to more tension with less distortion of the rod.
HOWEVER, I have retired the homemade one-way rod (the best in its day in 1985 when the book was first published) in favor of the comercially available one-way rods. See the update above for details.