
Machining a classic guitar neckblank
by William Cumpiano
My method of laying up the classic guitar neckblank and then slotting and partially shaping
the integral heel/headblock entirely on a table saw.

A double line is marked at an angle of 15° starting from a distance of 7.5 inches (19 cm) from one end of a 24" x 3" by 11/16" (61cm x 7.6 cm x 1.75cm) mahogany or Spanish cedar billet. The 7.5 measurement is the longer of the two edges seen above.
The double line serves as a corridor for the band saw blade. In order to make an accurate cut, the bandsaw blade should be square to the table as measured against the sides of the blade and against the teeth as well..

If the bandsaw blade is not squared in both directions as noted previously, the sawn surfaces will come out skewed to each other, rather than well-squared as shown at left.

Four tiny dots of white PVA (polyvinyl acetate) glue, such as Elmer's, will serve to temporarily tack the two elements together while truing the surfaces prior to creating the angle joint, or scarf.
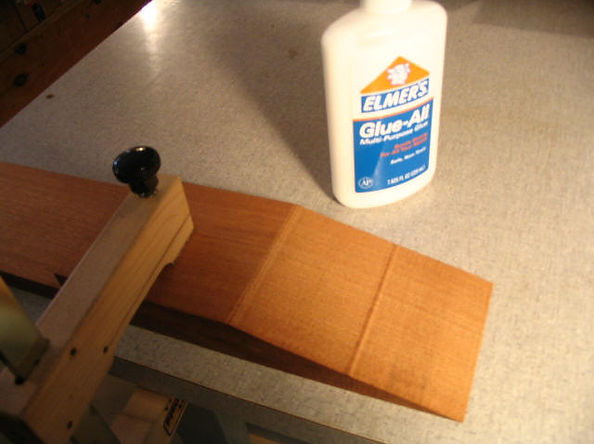
Align the two elements with the shorter on top of the longer as shown. If the slanted surfaces are skewed, align them so that the overage on one balances the underage of the other. In other words, the angled edge of one should cross the angled edge of the other to form a balanced 'X'. Clamp together as shown for about 15 minutes.

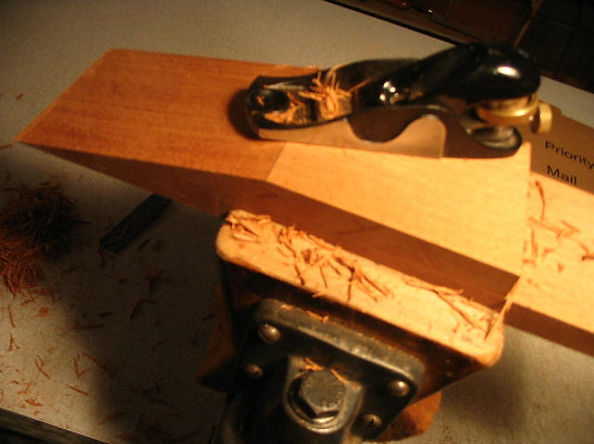
Clamp the longer of the two elements in a vise as shown and level the composite sloped surface with a very sharp block plane. Observe the changes in the surface very carefully, because these will give you clues as to where to shave and where to avoid. Bands of freshly-shaved and the old bandsawn texture will alternate as you progress. Stroke the surface with the plane where it needs to create straight-line, symmetrical bands, and keep shaving as the bands get narrower until they all disappear.

Periodically, check and redraw a squared pencil line precisely at the verge. If the verge is not square to the edges of the billet, redraw an new line just below and plane the surface until the verge matches the squared line. Notice the band of old bandsawn surface texture. The angled surface does not have to result at a precise 15° down from level when you are done. Approximate is acceptable.
Truing with the block plane is completed when the bands disappear and the knife edge, the verge and the meeting line in the middle are all approximately parallel. The surface may appear a bit textured with plane-blade marks at this point. These will be sanded off as follows:

The angled surface is smoothed on a sanding board until all plane marks are gone. It is best to draw the elements slowly and carefully against the sandpapered surface in uni-directional strokes only. If you pump the angled surfaces back and forth against the abrasive surface, you may impart a curve or sweep into them.

The final surfaces. Although you may stroke the angle oblique to the billet's centerline, the last several strokes on the abrasive surface should be parallel to it. During the process, brush off or vacuum off the dust often for quicker results.

You can knock the pieces apart with several smart raps of a hammer. If the glue dots were small, the elements should pop apart with little or no noticeable damage to their face surfaces.

Often, just the glue smudges are all that remain

The elements are placed on a rigid plywood or straight hardwood platform clamped in cantilevered fashion off the edge of the worktable. This photograph and the following show a headstock for a steel-string guitar, which has been reduced to 1/2". Classic headstocks must remain at full thickness when glued to the shaft.

Clamp small stop-blocks at both ends and clamp the shaft down vertically to the platform. Check with a square that the clamp on the shaft doesn't tip the shaft from vertical. Note the two additional caul blocks that must be prepared, about the size of the area to be glued. They should be slightly smaller that the gluing area. Additional notes for this procedure can be found in my book, Guitarmaking: Tradition and Technology.

Glue is applied sparingly--just sufficient to wet the surface--of the headstock angle; the headstock is put into place; then clamped vertically to the platform so that the angle surfaces align; the small scarf blocks are placed at both sides of the scarf joint; and then two clamps are placed across them--a deep throat that reaches to the bottom of the scarf and a smaller one across the top.

The location of the integral heel/headblock is then marked and the block is glued to the undersurface of the shaft as shown. The marks on my classic necks are as follows: starting from the verge on the top surface of the shaft, mark a line parallel to the verge line 1/4-inch from verge (denoting the width of the nut). The third line is your 12-fret location. and the fourth line, or end of the shaft is 1 1/2-inch below the 12th-fret line, which denotes the rear of the headblock. The rear of the heel/headblock is show above aligned with the fourth line.